In Part1 went over setting up iSCSI SAN, today i will go over enabling Failover cluster feature in Windows 2012
RC and build a 2 Node Cluster using the shared iSCSI disk's.
Lab:


Lab:

Adding
Failover Manager Feature and iSCSI virtual disk to Primary Server:
Enabling
Failover Feature:

Click on Manage and select ADD Roles
and Features...

Click Role-based or feature and click
next...

click next...

Click Application Serve role and click
next...

Enable Failover clustering, a window
pops up requesting to add required Features, click Add and then
click next....
Note:
MULTIPATH I/O Feature needs to be enabled if you have more then 1
path to disk's.
At the end of
the article I will add the steps required.

read through and click next...

Add any services if you need or else just click
next...
(Note: By default .Net Framework 4.5 is
already enabled and installed during the Windows 2012 RC install)

Enable the restart option if needed and
click Install...(Note: Enabling Failover Feature does't require rebooting so this option can be skipped).

Successfully enable the Failover feature ,click close...
Adding
the Virtual Disk :
Open
Server Manager and click Tools...

Click
iSCSI initiator..

Provide
the IP address or Name of the Target iSCSI server and click Quick
Connect..

Quick
connect window pops up, click on all the inactive disks and say
connect..

After
all the disk are connected, click Done...

Click
OK..
Adding Failover Manager Feature and iSCSI virtual disk to Secondary Server:
Follow all the steps same as Primary server .

So we successfully added the disk and connected.
Initializing
the Disk and Formatting:
Note:
If you are working on a Failover cluster the following steps needs to
be performed only on a Single Node of the cluster.
Following Steps are performed on the Node fooprimary:
Click
Tools in Server Manager and Click Computer Management....
Click
on Disk Management...
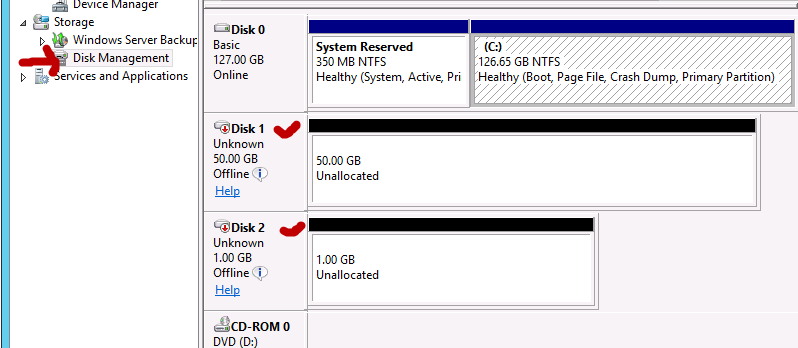
You
will see 2 disk's which we added using iSCSI initiator as Unknown and
offline status.

Right
click on each disk and say Online.

Right
click on disk and say Initialize Disk...

check
both the disk and click ok...

now
you will see Disk are online and Unallocated...

right
click on select New Simple Volume...


click next...

assign a drive letter and click next....

provide
a Volume label and click next..

click
Finish and perform the same steps for the other disk...

Now
you see both disks are online and healthy...
Lets login to Node 2 foosecondary:
Open
Computer Management and click Disk Management...

Note: Disk is offline and not with unknown status.
Right click and bring the disk online

You
will notice that disk are online with assigned drive letters and
volume name.

The
above screen shot shows that both servers can see the disk.
Put
the disk offline on both the Nodes and we will go over
Configuring Failover Manager.
FAILOVER
MANAGER CONFIGURATION:
Open
Server Manager on any Node.

Select
tools and click Failover cluster Manger.
Note:
I am logged in on Primary Node(FOOPRIMARY) with domain Administrative
rights.

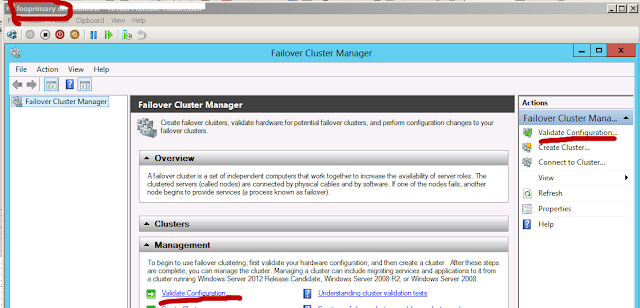
Click Validate configuration...

click next...

Add all the nodes and click next..

select Run all tests.. and click
next....

click next...

Make sure all the testing completes
with no errors.
If you want to begin with Cluster
Creation you can leave the Check box and click Finish it will start
the cluster creation wizard. If not then disable the check box and
you can click the create cluster from
Failover cluster Manager.


Add all the servers that needs to be
part of cluster and click next...

Provide a Cluster Name and IP address
and click next...
Note:
Before you can click next, make sure you are either domain
administrator or pre populate the cluster name computer object.
Please
refer to this technet article which explains in depth.
In
windows 2008 it was not possible to provide an OU container fort the
cluster Name object to be created, it always gets created in
Computer's OU,but now in Windows 2012 you can provide the LDAP path
and it will create in the required OU.

Note: Previous version all storage are
added by default, but now you can decided if you need or not.
Leave the Check box to add all storage
to Cluster and click next...

Click Finish...
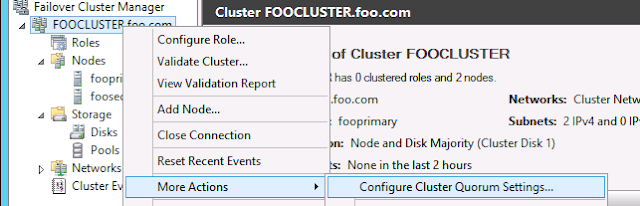
Quorum
Settings:

when creating cluster, depending on the
number of Nodes it automatically picks the correct quorum settings
and disk.

If you feel anything needs to be
changed , please go to change under configure cluster quorum
settings...
We
have successfully created the Cluster, let's test the Failover:
Active Node before Failover:

Active Node after Failover:

We have successfully tested the
Failover.
Note: The default cluster group was missing in Failover Manager in Windows 2008 and you had to use either cluster.exe or power shell to move cluster group.In Windows 2012 they have added the cluster group to GUI.Right click on Cluster name and you have option to move to best possible Nodes.
Optional
Steps:
If
you have more then 1 path to iSCSI disk's then you need to
follow the below steps after you connected the disk using iSCSI
initiator.
Adding
iSCSI support to MPIO:
Open
Server Manager and click Tools

Click
MPIO

Enable
Add support for iSCSI devices and click Add. A reboot required window
pops up, click yes and server will get rebooted automatically.
Note:
You can say NO and reboot manually too...

After
reboot, go back to MPIO properties and you will see new Device
added.. click OK.
great job..
ReplyDelete